Installation Guide
To download infantry, go to Download page and click the Download button.
Once the game is finished downloading, unzip it and place in C:\Program Files.
Please make sure you have the latest version of .NET framework from Microsoft, available here: http://www.microsoft.com/net
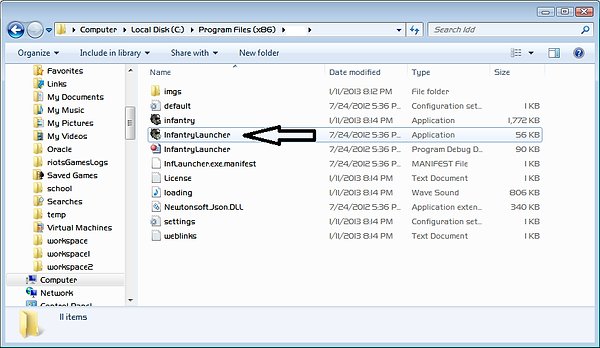
Click the Infantry Launcher application to begin the client

The program wil automatically begin downloading the assets you need to play in the various zones. If you do not have an account, Click sign up and fill out the form. Registration requires no e-mail verification and the only reason an e-mail is needed is in case you lose your password.

Once everything is downloaded you can press the Play button. Once you do this you will be presented with a License screen. You must agree to the license to play.
This is the main screen where you can type in an alias you want to use. If it does not exist the client will ask you if you want to create it. If this is your first time going into a zone you will have to download some more files, such as the level file to be able to play.
It is reccomended you set your resolution to Window mode as this seems to work on most versions of Windows. If you do this you will be able to resize the client window manually.

Along with your resolution, it is highly reccomended you switch your controls to Mouse Mode instead of keyboard only. This makes aiming and general gameplay much easier in some zones. For Ambush Zone, its reccomended Standard Keyboard. Also make sure to change all the noted items to what is shown in the pictures to improve framerate.
Under the View menu select Movement Configuration and set it up so it looks like so:

Under View -> Keyboard Configuration:
Make sure to tick "Press enter to type messages"
This set up uses TFGH instead of WASD, but you can easily change it to WASD. Rotate left and right can be anything since you will be rotating your character with a mouse instead of the keyboard.
Your Message Macros are ways you can you save certain commands and this is explained in depth in the Game Play guide.


Once all this is complete you can enter a zone of your choosing. Please refer to the Game Play guide for more info on how to play.
GamePlay Guide
This is how the game is organized:
The team list is the people currently playing, and the people under "spec" are the spectators. While you are a spectator you can spectate other players by right-clicking on a users name and clicking "Spectate"
You can right click on the Team list and chat window and click "Opaque" to make them transparent.
Weapons and ammo are below the player list. Here you can right click on weapons and assign a key to them. You will have to do this if you wish to use a weapon.
If your weight is over 0% you will move slower, and if it is close to 100% you will be unable to move. To solve this just right click on an item and click Drop Weapon or go to the store and sell the item
In this image you will see red and yellow blocks; This is not how the game normally looks. These blocks are called physics and they dictate what you can shoot through. To enable/disable seeing them just type ?showphysics
The mini-map is self explanatory. Red dots are enemies, and other colored dots are your teammates.
Chat:
You can use certain commands to chat with the public, with your own team, and with individual players.
Typeing "Message" and pressing enter will send a message to the public arena. These messages will be in blue
Typing " 'Message" or "//Message" will send a message to your own team. These messages will be in yellow
Typing " :Palm: Message" will send a message to one player. These messages will be in green

Some zones require you to pick a class to play. Pressing F11 takes you to the Class select Screen. In this screen you can also purchase attributes if they exist in the zone:
1: Category: sometimes classes are grouped in categories if there is a large number of them
2: Experience: The current amount of experience you have
3: Rank: This is based on the amount of experience you have and doesn't affect anything
4: Class: These are the classes available to use. The one you currently own will have the word "own" next to it.
5: Price: This is the experience cost of a skill/class. When you purchase a class or skill this amount will be deducted from your total experience
6: Buy button: Press this to buy the currently selected class or skill
7: Info: By clicking on a class you will be able to see some information about the class, such as a description and other skills you may need to purchase the skill.
If the class or skill is in red, this means you cannot purchase it. White means it is available to you.

In certain zones you can also buy weapons to customize your character. (Press F10 to go to the Store)
-You cannot buy items unless you are in the Drop Ship in certain zones, and if you cannot it will tell you are in an "unavailable location".
-You can select the quantity of an item to buy
-Items in red are not buyable. Clicking on them and reading the Info will give you information on how to be able to buy the item
-You are able to buy ammo, armor, buildables, equipment, vehicles, and weapons here in most zones
1: A description of the item
2: Required skills for an item -- If the item is red it is because you do not have the required skills to use the item. Looking at this will tell you if you need to switch classes or get an attribute if the zone has that

Macros:
In this game you have to buy ammo for your weapons in certain zones. It may get annoying having to go to the store and purchasing items so the game has Macros which you can assign to keys as explained in the installation guide.
To set a macro:
Type ?buy Variable Armor:1, Grenade - EMP:#3, etc and then press the macro key. A message will appear that says your macro has been set. Once this happens all you have to do is press the assigned macro key to send the message.
Using a # character before the amount will make it so you will only buy that amount of the item. For example, if you have 3 grenades and your macro is set to #2, the macro will not buy any grenades until you fall below the 2 mark.